
|
NARESH NADHAN 'S
Oracle E-Business Suite |
|
|
Oracle E-Business Suite supports today’s evolving business models, drives productivity, and meets the demands of the modern mobile user.
|
|
NARESH NADHAN 'S
Oracle E-Business Suite |
|
|
Oracle E-Business Suite supports today’s evolving business models, drives productivity, and meets the demands of the modern mobile user.
|
|
We use the Workflow Definitions Loader to save or load process definitions from a database or flat file. We can also define as it is a utility that moves workflow data between a file and a database and it is also used to upgrade, upload and download the workflow data.
How can one download, upload, upgrade, force upload a workflow to the database? Download : To download a wft file of a specific item type, please use the following command: WFLOAD apps/pwd 0 Y DOWNLOAD file.wft ITEMTYPE1 e.g. WFLOAD apps/apps 0 Y DOWNLOAD POAPPRV.wft POAPPRV Note: Please make sure to replace file with a more descriptive name, and ITEMTYPE1 with the item type for which you are download the workflow definition. Upload: The upload option is used to load a process definition from a flat file into the database. The upload mode is useful to someone who is developing a workflow process. It allows the developer to save definitions to the database without concern that accidental customizations to existing objects might prevent the upload of some process definition elements. The Workflow Definitions Loader uses the access level defined by the input file to upload the process definitions from the file and therefore will overwrite objects in the database that are protected at a level equal to or higher than that file's access level. There are two options for the upload process: 1. Upload the workflow definition file wft using the Workflow Definitions Loader concurrent request: A. Login in to the System Administrator responsibility. B. Choose requests/run C. Choose 'Workflow Definitions Loader' D. The report has three parameters: item type, file location, and mode: E. Leave item type blank F. For the second put in the full path (no Aliases) for the workflow file NT Server Example: d:/oracle/appltop/po/11.5.0/patch/11.5/import/US/poxwfrqa.wft Linuz Server Example: $oracle/appltop/po/11.5.0/patch/11.5.0/import/US/poxwfrqa.wft G. For the third parameter, Mode, choose Force. IMPORTANT: This will overwrite the existing workflow in the database, including any customizations. Proceed only after making sure the customized workflow backup is saved in its own flat file. 2. To upload a wft file to the database, By using WFLOAD command: WFLOAD apps/pwd 0 Y UPLOAD file.wft e.g. WFLOAD apps/apps 0 Y UPLOAD POAPPRV.wft Note: Please make sure to replace file.wft with the name of the wft file containing the workflow definition to be uploaded to the database. Upgrade: The upgrade option is used to apply a seed data upgrade to a database from an input file. The Workflow Definitions Loader assumes the access level of the file's creator (seed data provider) and overwrites any objects protected at a level equal to or above the upgrade file's access level. The Loader program preserves any customizations made to customizable seed data in the database. To upgrade a wft file on the database, please use the following command: WFLOAD apps/pwd 0 Y UPGRADE file.wft e.g. WFLOAD apps/apps 0 Y UPGRADE POAPPRV.wft Note: Please make sure to replace file.wft with the name of the wft file containing the workflow definition to be upgraded on the database. Force Upload: You can use the "Force" to force an upload of the process definitions from an input file to a database regardless of an object's protection level. You should be certain that the process definition in the file is correct as it overwrites the entire process stored in the database. The Force mode is useful for fixing data integrity problems in a database with a known, reliable file backup. If you would like to force the load of specific wft files, please use the following command, while replacing pwd with the apps password, and file.wft with the name of the wft file that you want to force upload to the database: To force upload a wft file to the database, please use the following command: WFLOAD apps/pwd 0 Y FORCE file.wft e.g. WFLOAD apps/apps 0 Y FORCE POAPPRV.wft Note: Please make sure to replace file.wft with the name of the wft file containing the workflow definition to be force uploaded to the database. Note: In case of working on a translated workflow process definition, before using the above commands, make sure to set the environmen variable NLS_LANG properly, using a syntax like the following: export NLS_LANG=LANGUAGE_TERRITORY.CHARACTERSETe.g. export NLS_LANG=FRENCH_FRANCE.UTF8
0 Comments
Script to check user availability:
set lines 132 col USER_NAME format a50 select USER_ID,USER_NAME,START_DATE,END_DATE from FND_USER WHERE USER_NAME = upper(‘&user_name’); Script to find list of responsibility attached to a specific userid OR all userid: set lines 132 col user_name format a25 col responsibility format a40 col application format a40 SELECT UNIQUE fu.user_id, fu.user_name user_name, fr.responsibility_key responsibility, fa.application_name application FROM fnd_user fu, fnd_user_resp_groups fg, fnd_application_tl fa, fnd_responsibility fr WHERE fg.user_id(+) = fu.user_id AND fg.responsibility_application_id = fa.application_id AND fa.application_id = fr.application_id AND fg.responsibility_id = fr.responsibility_id AND fu.user_name like upper(‘%&user_name%’) AND fg.end_date is Null ORDER BY fu.user_id, fa.application_name, fr.responsibility_key; Find the application short name by Responsibility name: SELECT FA.APPLICATION_SHORT_NAME, FR.RESPONSIBILITY_KEY, FRG.SECURITY_GROUP_KEY, FRT.DESCRIPTION FROM FND_RESPONSIBILITY FR, FND_APPLICATION FA, FND_SECURITY_GROUPS FRG, FND_RESPONSIBILITY_TL FRT WHERE FR.APPLICATION_ID = FA.APPLICATION_ID AND FR.DATA_GROUP_ID = FRG.SECURITY_GROUP_ID AND FR.RESPONSIBILITY_ID = FRT.RESPONSIBILITY_ID AND FRT.LANGUAGE = 'US' AND FRT.RESPONSIBILITY_NAME = '&RESPONSIBILITY_NAME'; Detail SQL Query to get list of responsibilities for a user in oracle apps: SELECT fu.user_name "&User Name", frt.responsibility_name "Responsibility Name", furg.start_date "Responsibility Start Date", furg.end_date "Responsibility End Date", fr.responsibility_key "Responsibility Key", fa.application_short_name "Application Short Name" FROM fnd_user_resp_groups_direct furg, applsys.fnd_user fu, applsys.fnd_responsibility_tl frt, applsys.fnd_responsibility fr, applsys.fnd_application_tl fat, applsys.fnd_application fa WHERE furg.user_id = fu.user_id AND furg.responsibility_id = frt.responsibility_id AND fr.responsibility_id = frt.responsibility_id AND fa.application_id = fat.application_id AND fr.application_id = fat.application_id ORDER BY fu.user_name,frt.responsibility_name; Query to find the last access date to a Responsibility in R12 SELECT frt.responsibility_name, Max(flr.start_time) FROM applsys.fnd_login_responsibilities flr, applsys.fnd_user fu, applsys.fnd_logins fl, applsys.fnd_responsibility_tl frt WHERE fl.login_id = flr.login_id AND fl.user_id = fu.user_id -- AND fu.user_name = '&Username' -- Comment for Complete List AND frt.responsibility_id = flr.responsibility_id GROUP BY frt.responsibility_name SELECT frt.responsibility_name,fu.user_name, Max(flr.start_time) "Last Connect" FROM applsys.fnd_login_responsibilities flr, applsys.fnd_user fu, applsys.fnd_logins fl, applsys.fnd_responsibility_tl frt WHERE fl.login_id = flr.login_id AND fl.user_id = fu.user_id AND fu.user_name = '&Username' -- Comment for Complete User List AND frt.responsibility_id = flr.responsibility_id and frt.responsibility_name = '&ResponsibilityName' GROUP BY frt.responsibility_name ,fu.user_name But the above query is only giving the results only if the users have used the standard oracle forms. For Ex,If the user only used a web based form(Like the Supplier Form,iProcurement),its not showing in the results. The Profile option Sign-On:Audit Level is set to Form at the site level. Ran Sign-on Audit Responsibilities,Sign-on Audit Forms concurrent requests from system Administrator.Both the reports are not including if a user used web based form. First make sure that The Database and its listener are up before going ahead with starting of Application services .This can be confirmed by making sqlplus connection to apps user from the applmgr account .In case of shutting down an Application Instance ,Database and Listener should be stopped after making sure that application services are down .
To start the oracle Application services there are pre-built shell scripts in place in INST_TOP,we need to use them to start/stop services . The default location of startup/shutdown scripts are : $INST_TOP/admin/script/$CONTEXT_NAME The following two scripts can be used to startup and shutdown the application services respectively . adstrtal.sh -To start all services. adstpall.sh -To stop all services. Apart from these two scripts ,there are a script for each oracle application services in the same directory as adstrtal.sh & adstpall.sh. If incase our requirement is just to to bounce a single component then we can straight forward go and use the single script to bounce it .But incase our requirement to bounce all services ,we need not to use the individual scripts . Not all customers use all components of Oracle Applications ,some services of Oracle Applications like .,discoverer,icx,bulk loader, server are not used by all customer .adstrtal.sh & adstpall.sh scripts are intelligent enough to startup only the requirement components. Basically they read the context XML file to know what all components are enabled for the particular node of Applications instance. Only services for which oa_process_status tag is set to enable are started up/stopped by adstrtal.sh & adstpall.sh script . Shell script first checks what all services are enabled ,then calls the individual scripts for those processes that are enabled. Syntax for using these two scripts: $adstpall.sh apps/apps_password $adstrtal.sh apps/apps_password Sometimes when we try to compile or create packages it may hang ,
Generally package compilation or creating doesn't take much time in the oracle database even if there is an issue with PL/SQL code . So we need to find the cause when Compiling Oracle Packages takes a lot of Time. Basically it happens due to locking sessions so we need to identify the locking sessions whatever using the same package and kill it . Below are the scripts to find the locking session details . Script 1: select * from dba_ddl_locks where name like '%PACKAGE NAME%'; Script 2: SELECT s.sid, l.lock_type, l.mode_held, l.mode_requested, l.lock_id1, FROM dba_lock_internal l, v$session s WHERE s.sid = l.session_id AND UPPER(l.lock_id1) LIKE '%PACKAGE NAME%' AND l.lock_type ='Body Definition Lock'; Script 3: Get the session details which are blocking package definition. COL sid FOR 999999 COL lock_type FOR A38 COL mode_held FOR A12 COL mode_requested FOR A12 COL lock_id1 FOR A20 COL lock_id2 FOR A20 COL kill_sid FOR A50 SELECT s.sid, l.lock_type, l.mode_held, l.mode_requested, l.lock_id1, 'alter system kill session '''|| s.sid|| ','|| s.serial#|| ''' immediate;' kill_sid FROM dba_lock_internal l, v$session s WHERE s.sid = l.session_id AND UPPER(l.lock_id1) LIKE '%&package_name%' AND l.lock_type = 'Body Definition Lock' / Script 4: Check out what the offending session is doing . SELECT s.sid, NVL(s.username, 'ORACLE PROC') username, s.osuser, p.spid os_pid, s.program, t.sql_text FROM v$session s, v$sqltext t, v$process p WHERE s.sql_hash_value = t.hash_value AND s.paddr = p.addr AND s.sid = &session_id AND t.piece = 0 -- optional to list just the first line ORDER BY s.sid, t.hash_value, t.piece / Script 5: You can get more info about the offending sessions by using below SID and PID script . if those sessions are related to concurrent requests ,you can find the info from the scripts below . Get the current running and previous runs history and take the necessary action . You can Get the concurrent request ID and Name by using below scirpt . set echo off pages 100 lines 202 column REQUEST heading 'Request' format a9 column PHASE heading 'Phase' format A8 column STATUS heading 'Status' format A8 column PROGRAM heading 'Program Name' format A40 column SHORT heading 'Short Name' format A15 column REQUESTOR heading 'Requestor' format A15 column START_TIME heading 'Start Time' format A15 column RUN_TIME justify left heading 'Time(e)' format 999999.9 column OSPID heading 'OSPID' format a5 column OS_PIDa heading 'OSPIDA' format a6 column SID heading 'SID' format 99999 column serial# heading 'Serial#' format 99999 select substr(fcrv.request_id,1,9)REQUEST, decode(fcrv.phase_code,'P','Pending','R','Running','I','Inactive','Completed')PHASE, decode(fcrv.status_code, 'A','Waiting', 'B','Resuming', 'C','Normal', 'F','Scheduled', 'G','Warning', 'H','On Hold', 'I','Normal', 'M','No Manager', 'Q','Standby', 'R','Normal', 'S','Suspended', 'T','Terminating', 'U','Disabled', 'W','Paused', 'X','Terminated', 'Z','Waiting',fcrv.status_code)STATUS, substr(fcrv.program,1,40)PROGRAM, substr(fcrv.PROGRAM_SHORT_NAME,1,15)SHORT, substr(fcrv.requestor,1,15)REQUESTOR, -- to_char(fcrv.actual_start_date,'MM/DD/RR HH24:MI')START_TIME, round(((sysdate - fcrv.actual_start_date)*1440),1)RUN_TIME, substr(fcr.oracle_process_id,1,7)OSPID, s.sid,s.serial# --substr(fcr.os_process_id,1,7)OS_PIDa from apps.fnd_conc_req_summary_v fcrv, apps.fnd_concurrent_requests fcr, v$session s, v$process p where fcrv.phase_code = 'R' and fcrv.request_id = fcr.request_id and s.paddr = p.addr and fcr.oracle_process_id = p.spid and fcrv.concurrent_program_id not in ('40112','40113','36887') --and trunc(fcrv.actual_start_date) like trunc(sysdate) order by PHASE, STATUS, REQUEST desc; Script 6: To know the history of the Requests /Previous Runs : SELECT a.request_id,b.user_concurrent_program_name,to_char(a.actual_start_date,'DD-MON-RR HH24:MI:SS'), to_char(a.actual_completion_date,'DD-MON-RR HH24:MI:SS'), decode(a.phase_code,'R','Running','P','Inactive','C','Completed', a.phase_code), decode(a.status_code,'E','Error', 'C','Normal', 'X','Terminated', 'Q','On Hold', 'D','Cancelled', 'G','Warning', 'R','Normal', 'W', 'Paused', a.status_code), a.ARGUMENT_TEXT FROM apps.fnd_concurrent_programs_vl b,apps.fnd_concurrent_requests a WHERE a.concurrent_program_id = b.concurrent_program_id and b.user_concurrent_program_name like '%&CONCURRENT_PROGRAM%' order by 3; Script 7: Run the kill session command (kill_cmd) generated from the script 3 output in the first script if required . alter system kill session '218,12455' immediate; This chapter describes the Oracle E-Business Suite architecture and the key features the architecture supports, plus some related points. Topics include:
Let's begin the topic . Generally Oracle E-Business suite architecture or Machine can be divided into 3 parts or technically we can call it as "Tier" i.e. 3 Tier Architecture . Various servers or services are distributed among three Tiers . 1. The Client (Desktop) Tier. 2. The Application Tier. 3. The Database Tier. 5. The Oracle E-Business Suite Technology Layer 6. Oracle Configuration Manager 7. Oracle E-Business Suite Patch Nomenclature in Before going to the Architecture let's have a look on few technical words i.e. Server or Services ,Tier, Machine. Server : A server (or services) is a process or group of processes that runs on a single machine and provides a particular functionality. For example, Web services process HTTP requests, and Forms services process requests for activities related to Oracle Forms. The Concurrent Processing server supports data-intensive programs that run in the background. Tier : A tier is a logical grouping of services, potentially spread across more than one physical machine. The three-tier architecture that comprises an Oracle E-Business Suite installation is made up of the database tier, which supports and manages the Oracle database; the Application Tier ,which supports and manages the various Oracle E-Business Suite components, and is sometimes known as the middle tier; and the Client Tier (Desktop), which provides the user interface via an add-on component to a standard web browser. Machine : A machine may be referred to as a node, particularly in the context of a group of computers that work closely together in a cluster. Each tier may consist of one or more nodes, and each node can potentially accommodate more than one tier. For example, the database can reside on the same node as one or more application tier components. Note, however, that a node is also a software concept, referring to a logical grouping of servers. Centralizing the Oracle E-Business Suite software on the application tier eliminates the need to install and maintain application software on each client PC, and also enables Oracle E-Business Suite to scale well with an increasing load. Extending this concept further, one of the key benefits of using the Shared Application Tier File system Model (Originally Shared APPL_TOP) is the need to maintain only a single copy of the relevant Oracle E-Business Suite code, instead of a copy for every application tier machine. On the database tier, there is increasing use of Oracle RAC , where multiple nodes support a single database instance to give greater availability and scalability. Oracle E-Business Suite Three-Tier Architect 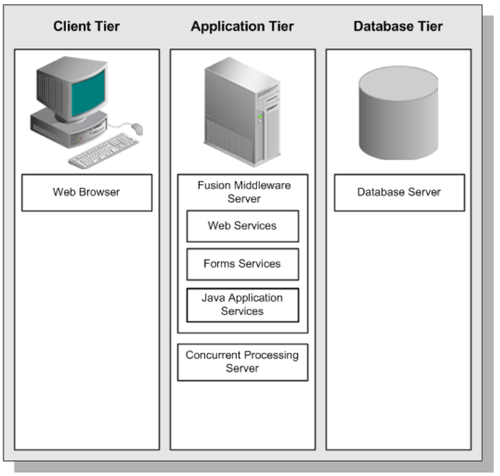 The connection between the application tier and the client tier can operate successfully over a Wide Area Network (WAN). This is because the client and application tiers exchange a minimum amount of information, for example only field values that have changed. In a global operation with users at diverse locations, requiring less network traffic reduces telecommunications costs and improves response times.
1. The Client (Desktop) Tier. The client interface is provided through HTML for the large number of HTML-based applications, and via Java applets for the smaller number of Forms-based applications and a few product specific features. Note: The client tier is sometimes referred to as the Desktop Tier : Client Tier and Application Tier Components 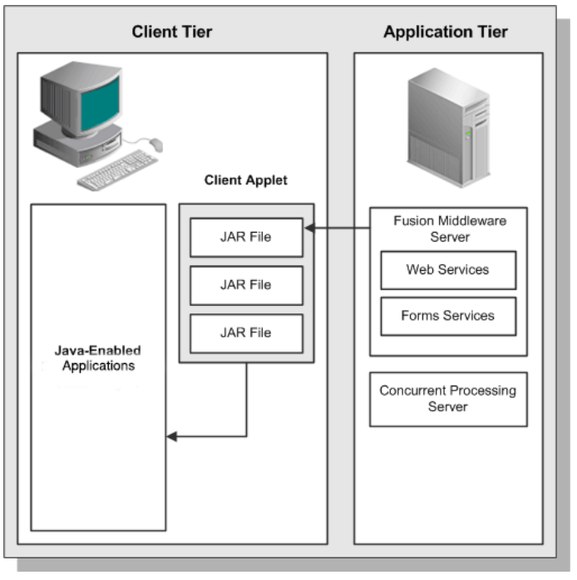 You log in via the Oracle E-Business Suite Home Page on a desktop client web browser. The Home Page provides a single point of access to HTML-based applications, Forms-based applications, and Business Intelligence applications. Once successfully logged in via the E-Business Suite Home Page, you are not prompted for your user name and password again, even if you navigate to other tools and products. Oracle E-Business Suite also retains preferences as you navigate through the system. For example, if you registered in the Home Page that German is your preferred language, this preference carries over whether you access Forms-based or HTML-based applications. Forms Client Applet: The Forms client applet is a general-purpose presentation applet that supports all Oracle E-Business Suite Forms-based products, including those with customizations and extensions. The Forms client applet is packaged as a collection of Java Archive (JAR) files. The JAR files contain all Java classes required to run the presentation layer of Oracle E-Business Suite forms. Desktop Java Runtime Environment: The Forms client applet must run within a Java Virtual Machine (JVM) on the desktop client. It is launched on the user's desktop using a Java Deployment technology, either Java Web Start or Java Plug-in. These are included as part of the Java Runtime Environment (JRE) software. Java Deployment technologies require the JRE software to be installed on the client, so that Java-based applications can run on it. After you download and install the JRE software, you will be able to run Forms-based applications . The Forms client applet and commonly used JAR files are downloaded from the Web server at the beginning of the client's first session. Less commonly used JAR files are downloaded as needed. All downloaded JAR files are cached locally on the client, ready for future sessions. This eliminates the network traffic that would be involved in downloading them whenever they were required. Java Web Start: Java Web Start launches Oracle E-Business Suite Java-based functionality as Java Web Start applications instead of as Java applets. Java Web Start is a Java Deployment technology that is installed as part of the Java Runtime Environment (JRE) software. It provides a browser-independent architecture for deploying Java technology-based applications to the client desktop, and is the recommended configuration for Oracle E-Business Suite. Java Plug-in: Running Oracle E-Business Suite's Java-based content using the Java Plug-in requires a browser that supports Netscape Plug-in Application Programming Interface (NPAPI) plug-ins. Most browsers have now phased out NPAPI plug-in support, preventing he Java Plug-in from working. Oracle E-Business Suite supports launching Java applets (such as the Forms applet) using the Java Plug-in for browsers that support it. 2. The Application Tier. The Application tier is the combination of various servers or services groups that process the business logic. And managing communication between the desktop tier and the database tier. This tier is sometimes still referred to as the Middle Tier. The Application Tier is the combination of Oracle Application server and Concurrent Manger server. You can verify above "Client Tier and Application Tier Components" Diagram for Application Tier components . Application Tier ORACLE_HOMEs in Release 12.2: Oracle E-Business Suite Release 12.2 uses two application tier ORACLE_HOMEs.
Application Tier Structure:  Notable features of this architecture include:
The Web services component of Oracle Application Server processes requests received over the network from the desktop clients, and includes the following major components:
If possible, the Web server services the requests itself, for example by returning the HTML to construct a simple Web page. If the page referenced by the URL needs advanced processing, the listener passes the request on to the Servlet Engine, which contacts the database server as needed. Note: Oracle WebLogic Server integration is new in Release 12.2. Generally we will get Two types of Application Requests from Client Tier. i.e. 1. HTML Based Application Requests. 2. Form Based Application Requests. Let's Have a look at How HTML requests will be processed. 1. HTML Based Application Requests: The Oracle HTML-based applications (originally known as Self-Service applications) add a browser-based, walk-up-and-use functionality to Oracle E-Business Suite. They include numerous products such as Self-Service Expenses, Self-Service Human Resources, Internet Procurement, Internet Receivables, Self-Service Time, Web Suppliers, iStore, iPayment, iSupport, and marketing, and have the following characteristics:
The Oracle Application Framework is the development platform for HTML-based applications. It consists of a Java-based application tier framework and associated services, designed to facilitate the rapid deployment of HTML-based applications. Notable Oracle Application Framework components include:
HTML-Based Applications Architecture:  Java Servlet Access with HTML-Based Applications:
An HTML-based Applications module uses the following access path:
 Oracle Application Framework Processing Details:
The following is a more detailed explanation of how the JSP obtains the content from the Oracle E-Business Suite tables and uses information from the metadata dictionary to construct the HTML page.
By default, Forms services in Oracle E-Business Suite Release 12.2 are provided by the Forms listener servlet, which, as described further below, facilitates the use of firewalls, load balancing, proxies, and other networking options. Benefits of using the Forms listener servlet include:
Forms Listener Servlet Architecture The Forms listener servlet is a Java servlet that delivers the ability to run Oracle Forms applications over HTTP or HTTPS connections. It hosts the Oracle E-Business Suite forms and associated runtime engine, mediating the communication between the desktop client and the Oracle database server, displaying client screens, and initiating changes in the database according to user actions. The Forms listener servlet caches data and provides it to the client as needed, for example when scrolling through multiple order lines that exceed the limitations of a single screen. The Forms listener servlet can communicate with the desktop client using either a standard HTTP network connection or secure HTTPS network connection. In contrast, Forms services (formerly known as Forms server) communicates with the desktop client using the TCP/IP network protocol, on top of which it layers its own protocol. The Forms listener servlet communicates with the Oracle database server using the Oracle Net networking infrastructure. The Forms listener servlet manages the creation of a Forms runtime process for each client, as well as network communications between the client and its associated Forms runtime process. The client sends HTTP requests and receives HTTP responses from the Web services, which acts as the network endpoint for the client. Forms Socket Mode Architecture In the traditional Forms server socket mode architecture, when a user initiates an action in the Forms client applet (such as entering data into a field or clicking a button), data is passed to a Forms server on the application tier. The user interface logic runs in the Forms server, and determines the appropriate user interface effect based on the user's action. For example, a window may open, or another field value may be populated. If necessary, the database tier is contacted for any data not already cached on the application tier, or for data-intensive processing. Forms Socket Mode Architecture:  Once a connection has been made, many operations can be performed with little or no further interaction with the Forms server. For example, when a few field values change in response to a user action, there is no need to update the entire screen. In this scenario, only the changed fields are updated with the new values.
Choice of Mode As stated, by default Oracle E-Business Suite Release 12.2 utilizes Forms listener servlet mode. However, socket mode is still supported, and may be useful in high-latency, bandwidth-constrained WAN environments. Concurrent Processing Server: Concurrent Processing is an Oracle E-Business Suite feature that allows these non–interactive and potentially long-running functions to be executed efficiently alongside interactive operations. It uses operating system facilities to enable background scheduling of data- or resource-intensive jobs, via a set of programs and forms. To ensure that resource-intensive concurrent processing operations do not interfere with interactive operations, they are run by a specialized component , the Concurrent Processing Server. Concurrent Processing Server Implementation: The server is located on the Oracle E-Business Suite application tier, and implemented via the Batch Processing Services Service Group. Concurrent Requests and Managers: Processes that run on the Concurrent Processing server are called Concurrent Requests . When you submit such a request, either through HTML-based or Forms-based applications, a row is inserted into a database table specifying the program to be run. Concurrent Manager then reads the applicable requests in the table, and starts the associated concurrent program. Concurrent Manager Location: Traditionally, the concurrent managers were installed on the same machine as the database. However, with the much faster local networks that are now common, and the typical co-location of database and application tier machines, it is generally preferable to run them on a separate machine. This greatly facilitates ease of management and maintenance, as well as providing deployment flexibility. Specialist Concurrent Managers: There are a number of specialized concurrent managers. The Internal Concurrent Manager (ICM): Controls all other concurrent managers. It administers the startup and shutdown of managers as defined by their work shift, monitors for process failure, and cleans up if a failure occurs. The ICM does not process concurrent requests itself (except for queue control requests, such as ACTIVATE, DEACTIVATE, or ABORT). While the basic ICM definition should not be changed, you can if required modify the sleep Time (number of seconds the ICM waits between checking for new concurrent requests), PMON (Process Monitor) cycle time (number of sleep cycles the ICM waits between checking for failed workers), and Queue Size (duration between checks for number of active workers, measured in PMON cycles). If Parallel Concurrent Processing (described below) is being used, you can also set some options for this. The Conflict Resolution Manager (CRM):Enforces rules designed to ensure that incompatible concurrent requests do not run in the same Conflict Domain (an abstract representation of the groupings used to partition data). As with the Internal Concurrent Manager, the basic CRM definition should not be changed, but you can modify the sleep time for each work shift, as well as some Parallel Concurrent Processing options. The Standard Manager: As shipped with Oracle E-Business Suite will accept and run any concurrent requests, as it has no specialization rules that would restrict its activities. Consequently, the definition of the Standard Manager should not be altered without careful planning, otherwise some programs might not be able to run at all. Jobs should only be excluded from the Standard Manager after ensuring they can be run by an alternative manager, such as a product-specific manager or user-defined manager. Transaction Manager: Support synchronous request processing, whereby a pool of server processes responds to requests from client programs. Instead of polling the concurrent requests table to obtain instructions, a transaction manager waits to be signaled by a client. An example is approval of an order, where execution of the request must take place quickly. The relevant transaction manager program runs on the server, transparently to the client. All transaction programs for a given manager process run in the same database session. Communication between the client and the server is conducted synchronously via Advanced Queueing. At the end of program execution, the client program receives a completion message and a return value, for example denoting approval of the order. This strategy of using non-persistent connections between the client and Transaction Manager processes enables a small pool of server processes to service a large number of clients with near real-time response. Concurrent Processing Architecture In Concurrent Processing, programs are run as operating system background processes. These programs may be written using a variety of Oracle tools, programming languages for executables, or the host operating system scripting language. As noted above, a concurrent program that runs in the concurrent manager's own operating system process is known as an immediate program. Immediate programs run as a function within the concurrent manager's program library. Examples include PL/SQL programs. In contrast, a concurrent program that runs in a child process of the concurrent manager process is known as a Spawned Program . Examples include SQL programs, SQL Loader programs, Oracle Reports programs, spawned C programs, and host language programs such as UNIX shell scripts or Windows command files. All reports are run through the Concurrent Processing server manager via the rwrun executable, which spawns an in-process server. This is in contrast to earlier releases of Oracle E-Business Suite, which used the now-obsolete Reports server. While C programs can be run as immediate programs, it is advisable to run them as spawned programs. This simplifies maintenance, without introducing any disadvantages. A concurrent request has a life cycle, which consists of three or possibly four phases. A Concurrent Program Library contains concurrent programs that can be called by a concurrent manager. An important example is the Oracle Application Object Library program library (FNDLIBR), which contains Oracle E-Business Suite immediate concurrent programs, and is assigned to the standard concurrent manager. Although each concurrent manager can only run immediate concurrent programs from its own concurrent program library, it can also run spawned or Oracle tool concurrent programs. Concurrent Processing Database Tables: Table : Content: FND_CONCURRENT_REQUESTS: Details of user requests, including status, start date, and Completion date. FND_CONCURRENT_PROGRAMS: Details of concurrent programs, including execution method, Whether the Program is constrained, and whether it must be run alone. FND_CONCURRENT_PROCESSES : Cross-references between concurrent requests and queues, and a history of concurrent manager processes. FND_CONCURRENT_QUEUES: Information about each of the concurrent manager queues. See my previous post for status codes and phases https://nareshnadhans.weebly.com/home/concurrent-request-status-codes-and-phase-codes Caution: Do not update these tables manually. You can (subject to your organization's archiving requirements) periodically run the "Purge Concurrent Requests and/or manager data" program to prevent these tables growing too large Concurrent Processing Operations: Because the Internal Concurrent Manager controls all the other managers, it must be running before any other manager can be activated. Once the ICM has been activated, it starts a Service Manager on each node that is enabled for concurrent processing. Acting as an agent of the ICM, the Service Manager starts the concurrent managers on its node, excluding any managers that have been deactivated, or that have no current work shift. The ICM can be activated and deactivated from the operating system prompt, or Oracle Applications Manager. It can also be deactivated (but not activated) from the Administer Concurrent Managers form. When the ICM is initiated on UNIX, the $FND_TOP/bin/startmgr program is invoked. This calls $FND_TOP/bin/batchmgr, which then Starts a shell process.
The ICM starts up a Service Manager on each node that is enabled for concurrent processing, by instructing the node's Applications Listener (which is dedicated to Concurrent Processing) to spawn a process running the Service Manager executable (FNDSM). The Applications Listener must be configured to source the Oracle E-Business Suite environment file before FNDSM is spawned. Following startup, the Service Manager acts as an agent of the ICM to start and stop concurrent managers on that node, according to their defined work shifts. Note: The Service Manager is a component of the Generic Service Management (GSM) architecture rather than Concurrent Processing, although GSM and Concurrent Processing are closely integrated. Concurrent manager processes on a specific node can be seen by running the UNIX commands: ps -ef | grep FNDLIBR ps -ef | grep FNDSM The Service Manager PID seen in the output of the second command can then, if desired, be used to locate all concurrent manager and service processes on the node, since the Service Manager is the parent process for them: ps -ef | grep <sm_pid> On Windows, the Task Manager can be used to locate concurrent manager processes. An FNDLIBR process runs for the Internal Concurrent Manager and each standard manager. The ICM can be distinguished by additional details being displayed, including some of the parameters it was started with. For every process that was successfully started at operating system level, the ICM inserts a row into FND_CONCURRENT_PROCESSES. It then updates the RUNNING_PROCESSES column to reflect the actual running processes as shown in FND_CONCURRENT_QUEUES. Viewing Concurrent Processing Output: The output from a concurrent processing job goes through several stages before being displayed to the user.
 Parallel Concurrent Processing:
(PCP) allows concurrent processing activities to be distributed across multiple nodes in an Oracle Real Application Clusters (Oracle RAC) environment or similar cluster system. By distributing concurrent processing in this way, hardware resources can be fully utilized, maximizing throughput and providing resilience to node failure, while retaining a central point of control. Parallel Concurrent Processing enables you to:
Parallel Concurrent Processing is enabled by default, so PCP is always available for use in environments where one or more concurrent processing nodes exist. Note: PCP does not require an Oracle RAC environment. Conversely, you do not have to use PCP in an Oracle RAC environment, although it typically makes sense to do so. Managing Concurrent Processing : From the command line, two commands can be entered to control the Internal Concurrent Manager: startmgr, which starts the ICM; and concsub, which is used to stop or abort the ICM, or request the ICM to check on the operating system process for each manager. In addition, an AutoConfig-enabled environment provides a number of scripts for starting and stopping application tier services from the command line. The script for concurrent processing startup and shutdown is INST_TOP/admin/scripts/adcmctl.sh. The various components of the concurrent processing system can be managed from various forms, such as Concurrent Manager: Administer, or from Concurrent Managers or Concurrt Requests under Oracle Applications Manager (OAM). Deadline Dates for Current Oracle Database Versions
Oracle publishes a Lifetime Support Policy to describe each aspect of the support that it provides. In summary, each new release of Oracle Database receives five years of Premier Support from its release date. If purchased, Extended Support provides an additional three years for a total of eight. In limited situations, the fee-based Market-Driven Support is also offered. At the end of those types of support, each release enters an indefinite Sustaining Support status. Here are the support end dates that should be on your radar: Version 11.2 (11g): Premier Support ended in January 2015 Extended Support ended December 31, 2020 Market-Driven Support is a paid service that ends December 31, 2022 Version 12.1.0.1 : Support for this release has ended, and it isn’t eligible for Extended Support Version 12.1.0.2 Premier Support ended July 31, 2019 WithoutExtendedSupport or an Unlimited License Agreement, Error Correction/Patching ended July 31, 2019 With Extended Support or an Unlimited License Agreement, Error Correction/Patching ends July 31, 2022 Version 12.2.0.1 Error Correction/Patching ended November 30, 2020 Limited Error Correction is available from December 1, 2020, through March 31, 2022 Extended Support is not available Version 12.2.0.2 (18c) Error Correction/Patching ends June 30, 2021 Extended Support isn’t available Version 12.2.0.3 (19c) Premier Support ends April 30, 2024 Extended Support runs from May 1, 2024, through April 30, 2027 With paid Extended Support, Error Correction/Patching is available through April 30, 2027 Without paid Extended Support, Error Correction/Patching is available through April 30, 2024 Version 21c Error Correction/Patching ends June 30, 2023 Extended Support is not available 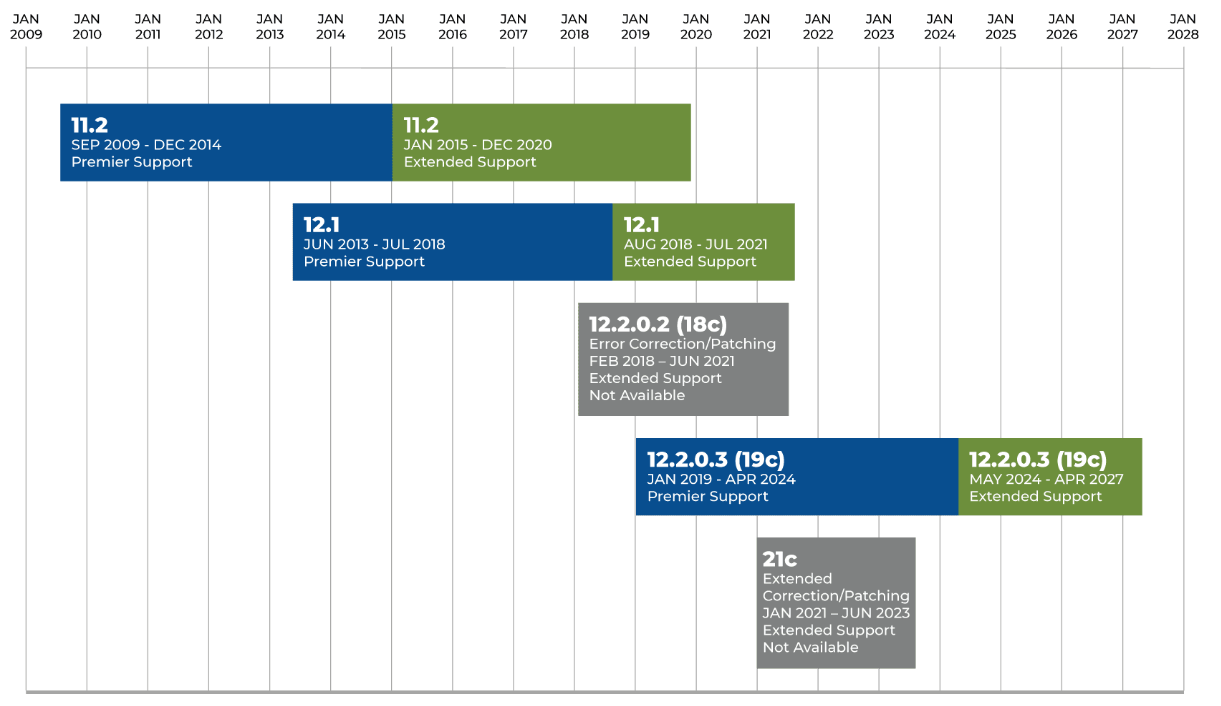 The main features of Oracle data guard is
1. High availability 2. Data protection 3. Disaster Recovery A Data guard configuration consists of one primary database and one or more standby database. The standby databases will be always in sync with primary database. If primary production database is unavailable due to planned or unplanned outage , then we can switch the production to standby database, making the application less affected by the outage. Apart from this we can use the standby database for taking backups and reporting queries, there by reducing some workload from production . There are 3 types of standby setup: 1. Physical standby 2. Logical standby 3. Snapshot standby PHYSICAL STANDBY: A physical standby database is an exact, block-for-block copy of a primary database. A physical standby is maintained as an exact copy through a process called REDO APPLY, in which redo data received from a primary database is continuously applied to a physical standby database using the database recovery mechanisms. So it will be always in sync with primary. This Standby database can be opened in read only mode( knows as ACTIVE DATA GUARD), for reporting purpose. Most of the corporations use physical standby for data guard configuration. LOGICAL STANDBY: The logical standby database is kept synchronized with the primary database through SQL APPLY, which transforms the data in the redo received from the primary database into SQL statements and then executes the SQL statements on the standby database. So it contains same logical information as that of production , but physical structure of data can be different. SNAPSHOT STANDBY: A snapshot standby database is a fully update-able standby database that is created by converting a physical standby database into a snapshot standby database. During this setup though it will receive logs from primary, But those redo won’t be applied to snapshot standby. Redo data received from the primary database is applied when a snapshot standby database is converted back into a physical standby database, after discarding allocable updates to the snapshot standby database. It provides an exact replica of a production database for development and testing purposes, while maintaining data protection at all times. PROTECTION MODES: It can have 3 protection modes. 1. MAXIMUM PROTECTION : This mode provides maximum protection. It guarantees zero data loss. In this mode the redo/transaction data must be written to both primary redo log and standby redo log. For any reason(mostly N/W issue) if it is unable to write to standby, Then primarya will get shutdown. 2. MAXIMUM AVAILABILITY: It provides the highest level of data protection that is possible without affecting the availability of the primary database.Transactions are not allowed to commit until all redo data are written to the online redo logs and propagated to at least one synchronized secondary database. If for any reason, the primary database cannot propagate its redo stream to one secondary database, the primary will NOT shutdown and operates as it it were in maximum performance mode until issues are fixed. 3. MAXIMUM PERFORMANCE: This is the default protection mode. With this protection mode, a transaction is committed as soon as the redo data needed to recover the transaction is written to the local (online) redo log. When we run, the following SQL Query/Script will provide the profile option values set at different levels. That is Site, Application, Responsibility, User.
So, this script lists ALL Users/Responsibilities/Applications set against a particular Profile option. Enter 'Profile Option Name' while running this query. Eg. FND: Debug Log Enabled, MO: Operating Unit You can get the exact name from table fnd_profile_options_tl. SELECT fpo.profile_option_name SHORT_NAME, fpot.user_profile_option_name NAME, DECODE (fpov.level_id, 10001, 'Site', 10002, 'Application', 10003, 'Responsibility', 10004, 'User', 10005, 'Server', 'UnDef') LEVEL_SET, DECODE (TO_CHAR (fpov.level_id), '10001', '', '10002', fap.application_short_name, '10003', frsp.responsibility_key, '10005', fnod.node_name, '10006', hou.name, '10004', fu.user_name, 'UnDef') "CONTEXT", fpov.profile_option_value VALUE FROM fnd_profile_options fpo, fnd_profile_option_values fpov, fnd_profile_options_tl fpot, fnd_user fu, fnd_application fap, fnd_responsibility frsp, fnd_nodes fnod, hr_operating_units hou WHERE fpo.profile_option_id = fpov.profile_option_id(+) AND fpo.profile_option_name = fpot.profile_option_name AND fu.user_id(+) = fpov.level_value AND frsp.application_id(+) = fpov.level_value_application_id AND frsp.responsibility_id(+) = fpov.level_value AND fap.application_id(+) = fpov.level_value AND fnod.node_id(+) = fpov.level_value AND hou.organization_id(+) = fpov.level_value AND fpot.user_profile_option_name IN ('&User_Profile_Option_Name') ORDER BY short_name; OraInventory:
OraInventory is repository (directory) which store/records oracle software products & their oracle_homes location on a machine. This Inventory now a days in XML format and called as XML Inventory where as in past it used to be in binary format & called as binary Inventory. There are basically two kind of inventories, 1. Local Inventory (also called as Oracle Home Inventory). 2. Global Inventory (also called as Central Inventory). 1. Local Inventory (also called as Oracle Home Inventory). There is one Local inventory per ORACLE_HOME. Inventory inside each Oracle Home is called as local Inventory or oracle_home Inventory. This Inventory holds information to that oracle_home only. (Local inventory is located in the Oracle Home, It contains the information relevant to its particular home. ) The only solution for local inventory corruption is to re-install the software. 2. Global Inventory (also called as Central Inventory). The central inventory directory outside the ORACLE_HOME (Global Inventory) This inventory stores information about. All the Oracle software products installed on all ORACLE_HOMES on a machine,These products can be various oracle components like database, oracle application server, collaboration suite, soa suite, forms & reports or discoverer server. Other non-oracle products such as Java Runtime env's (JRE). This global Inventory location will be determined by file oraInst.loc in /etc/oraInst.loc (on Linux) or /var/opt/oracle/oraInst.loc (solaris). If you want to see list of oracle products on machine check for file inventory.xml under ContentsXML. Yes, we can have multiple Global Inventory on a machine but if your upgrading or applying patch then change Inventory Pointer oraInst.loc to respective location. What to do if my Global Inventory is corrupted ? We can recreate global Inventory on machine using Universal Installer and attach already Installed oracle home by option cd $ORACLE_HOME/oui/bin ./runInstaller -silent -attachHome -invPtrLoc ./oraInst.loc ORACLE_HOME="<Oracle_Home_Location>" ORACLE_HOME_NAME="<Oracle_Home_Name>" Where ORACLE_HOME= Oracle home location. ORACLE_HOME_NAME provide any name. cd $ORACLE_HOME/oui/bin % ./attachHome.sh We can detach by using below .. cd $ORACLE_HOME/oui/bin/ ./runInstaller -silent -detachHome -local -noClusterEnabled -invPtrLoc $ORACLE_HOME/oraInst.loc -ignorePreReq ORACLE_HOME=$ORACLE_HOME ORACLE_HOME_NAME=TEST_HOME There are different options available to Clone Oracle Applications and Database.
Before start to apps cloning, we must know the basic steps and options which are available in Oracle EBS Applications. Cloning is the process to refresh the data from Source to Target i.e. PROD to DEV,TEST,UAT ..etc. On source system : We have to prepare the source system to make the refresh successful. 1. Perl adpreclone dbTier . If new Rapid Clone or Autoconfig updates are applied to the system, adpreclone.pl must be executed again on the dbTier and on the appsTier in order to apply the new files into the clone directory structures that will be used during the cloning configuration stage. When you run this commnad adpreclone.pl dbTier . This will run in two steps 1.1 Techstack 1.2 Database. 1.1 Techstack: It will create following directories in the ORACLE_HOME/appsutil/clone * Jlib * db * data where “Jlib” relates to libraries “db” will contain the Techstack information, “data” will contain the information related to datafiles and required for cloning. Creates driver files at ORACLE_HOME/appsutil/driver/instconf.drv. Converts inventory from binary to xml, the xml file is located at $ORACLE_HOME/appsutil/clone/context/db/sid_context.xml. 1.2 Prepare database for cloning: This includes creating database control file script and datafile location information file at $ORACLE_HOME/appsutil/template adcrdbclone.sql, dbfinfo.lst Generates database creation driver file at ORACLE_HOME/appsutil/clone/data/driver data.drv Copy JDBC Libraries at ORACLE_HOME/appsutil/clone/jlib/classes12.jar and appsoui 2.perl adpreclone.pl appsTier. This will create stage directory at $COMMON_TOP/clone. This also run in two steps. Techstack: Creates template files for -Oracle_iAS_Home/appsutil/template -Oracle_806_Home/appsutil/template Creates Techstack driver files for -IAS_ORACLE_HOME/appsutil/driver/instconf.drv -806_ORACLE_HOME/appsutil/driver/instconf.drv APPL_TOP preparation: -It will create application top driver file$COMMON_TOP/clone/appl/driver/appl.drv -Copy JDBC libraries$COMMON_TOP/clone/jlib/classes111.zip 3.Adfgclone.pl dbTier 1. It Creates the context file 2. Register the ORACLE_HOME 3. Relink the ORACLE_HOME 4. Configure the ORACLE_HOME 5. Recreate the control files 6. Start SQL*Net Listener 4.Adcfgclone.pl appsTier 1. It Creates the context file. 2. Register the ORACLE_HOME 3. Relink the ORACLE_HOME 4. It creates the INST_TOP 5. Configure APPL_TOP 6. Start APPS Process 5.adcfgclone.pl dbTechStack 1. Create the context file 2. Register ORACLE_HOME 3. Configure the ORACLE_HOME 4. Start SQL*Net Listener 6. adcfgclone.pl dbconfig This scripts configure the database 7. adcfgclone.pl database 1. Configure the ORACLE_HOME 2. Recreate the control files 3. Start SQL*Net Listener 8. adcfgclone.pl atTechStack 1. It Creates the context file 2. Register the ORACLE_HOME 3. Relink the ORACLE_HOME 4. Configure the ORACLE_HOME 5. Create INST_TOP 6. Start SQL*Net Listener 9. adcfgclone.pl appltop 1. Configure the apple top 2. Create INST_T3. OP 3. Start SQL*Net Listener |
AuthorNARESH NADHAN Categories |
